In this article, we will configure the IPSec Tunnel between Palo Alto and FortiGate Firewall. In this scenario, I’m using PANOS 8.1 in the Palo Alto firewall. Although, the configuration is almost the same in other PANOS versions too. A basic understanding of the IPSec VPN will help you to understand this article. You don’t need an additional license on both the devices for this feature. So, let’s start the configuration!
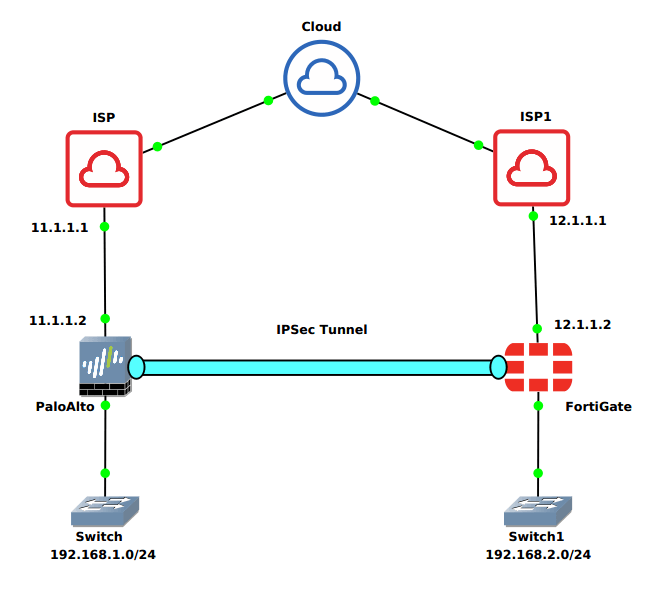
IPSec Tunnel Scenario for Palo Alto and FortiGate Firewall
You must need Public IP between Palo Alto and FortiGate Firewall. In this example, I’m going two random public IP addresses on both Palo Alto and FortiGate Firewall, which are reachable from each other.
Steps to configure IPSec Tunnel in Palo Alto Firewall
First, we will configure Palo Alto Firewall. You need to follow the following steps in order to configure IPSec Tunnel’s Phase 1 and Phase 2 on Palo Alto.
Creating a Security Zone on Palo Alto Firewall
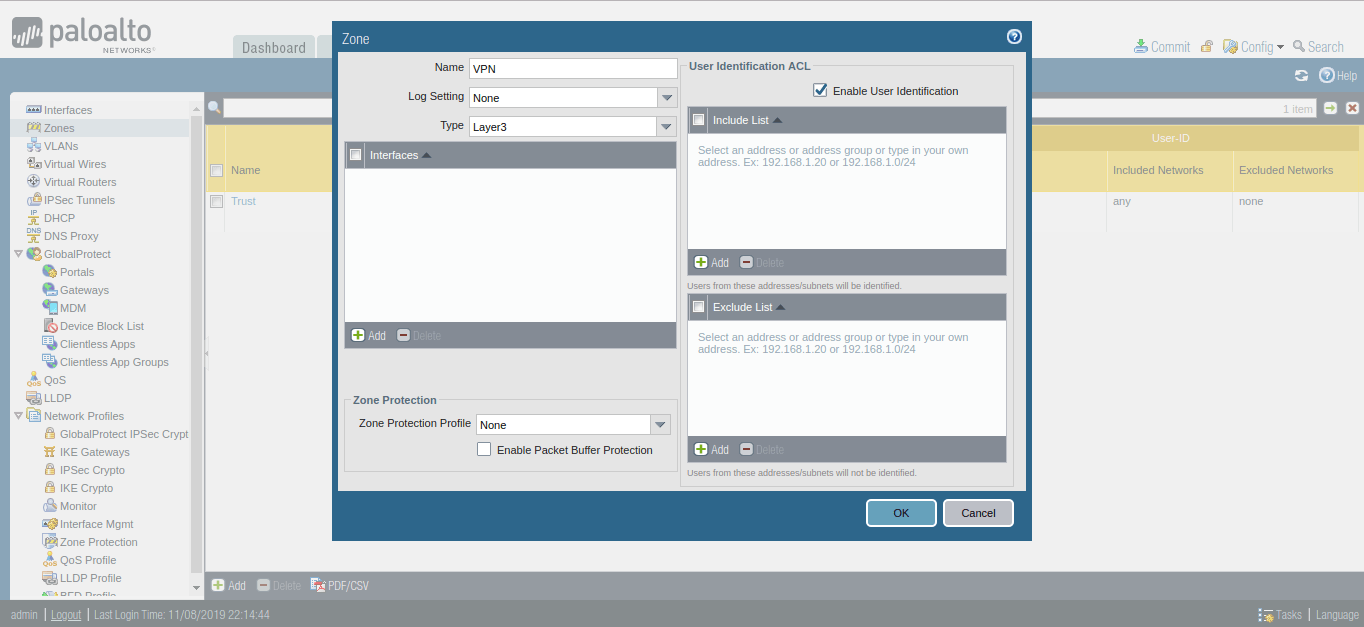
First, we need to create a separate security zone on Palo Alto Firewall. In order to configure the security zone, you need to go Network >> Zones >> Add. Here, you need to provide the Name for the Security Zone. You can provide any name as per your convenience.
Creating a Tunnel Interface on Palo Alto Firewall
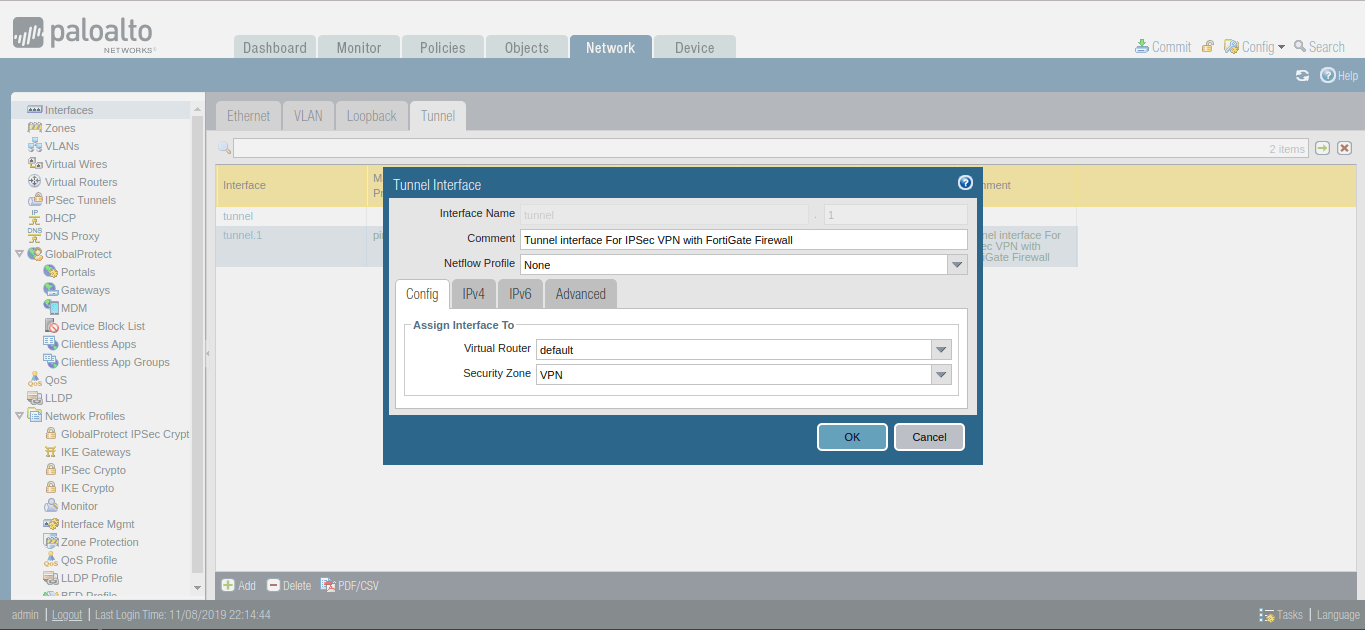
You need to define a separate virtual tunnel interface for IPSec Tunnel. To define the tunnel interface, Go to Network >> Interfaces >> Tunnel. Select the Virtual Router, default in my case. Also, in Security Zone filed, you need to select the security zone as defined in Step 1. Although, you do not need to provide IPv4 or IPv6 IP address for this interface. Also, you can attach Management Profile in Advanced Tab if you need it.
Defining the IKE Crypto Profile [Phase 1 of IPSec Tunnel]
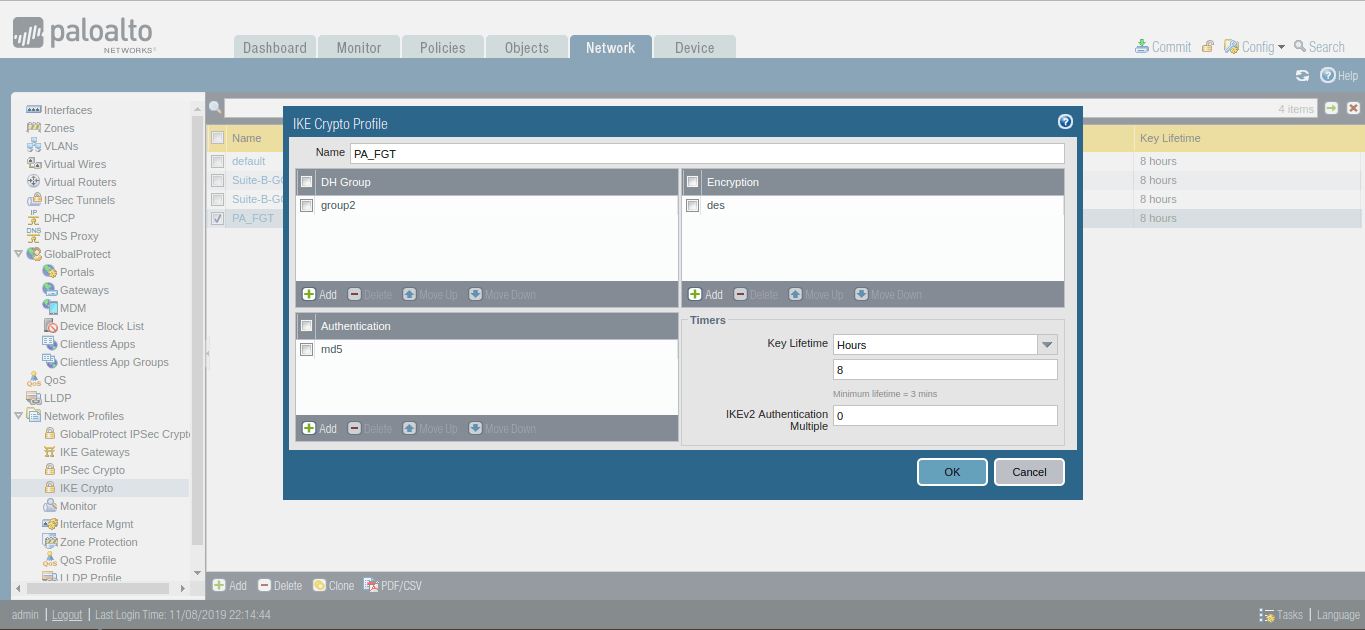
Now, you need to define Phase 1 of the IPSec Tunnel. You need to go Network >> Network Profiles >> IKE Crypto >> Add. Here, you need to give a friendly name for the IKE Crypto profile. Then, define the DH Group, Encryption and Authentication Method. By default, Key lifetime is 8 Hours. You can change it as per your requirement.
Defining the IPSec Crypto Profile [Phase 2 of IPSec Tunnel]
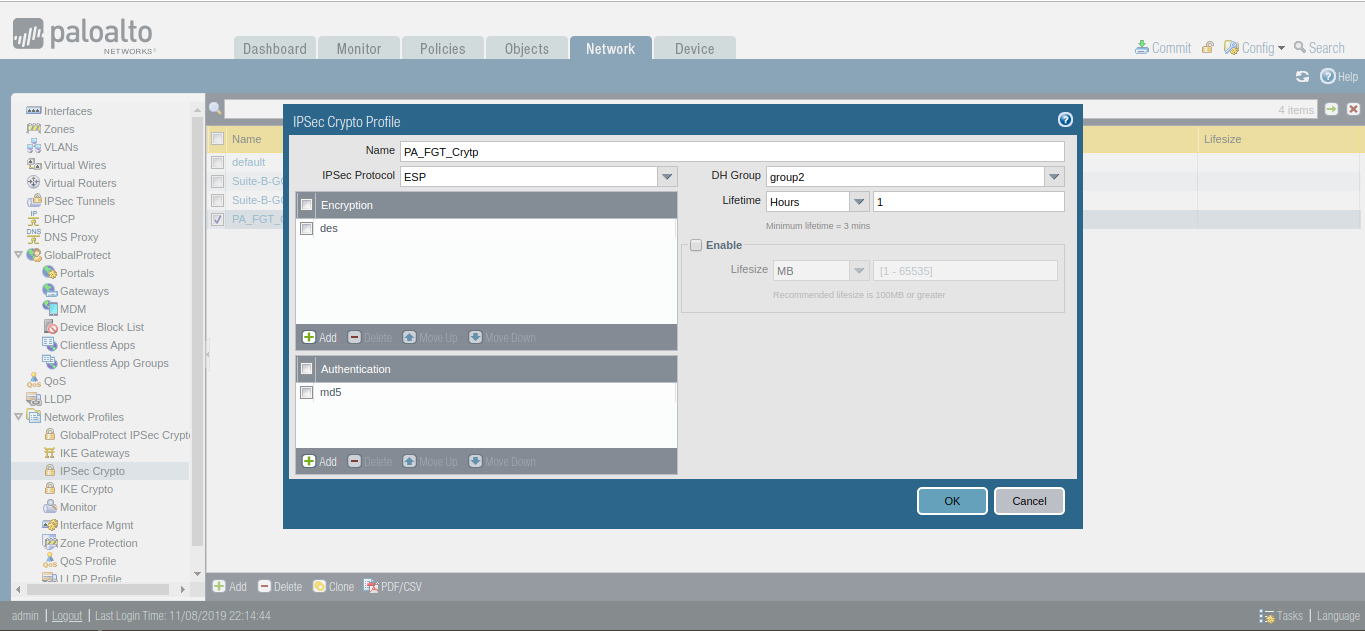
Now, you need to define Phase 2 of the IPSec Tunnel. You need to go Network >> Network Profiles >> IPSec Crypto >> Add. Here, you need to give a friendly name for the IPSec Crypto profile. Select the IPsec Protocol as per your requirement. You have ESP (Encapsulation Security Protocol) and AH (Authentication Heade) protocol for IPSec. Then, define the DH Group, Encryption and Authentication Method. By default, Key lifetime is 1 Hour. You can change it as per your requirement.
Defining the IKE Gateway Profile
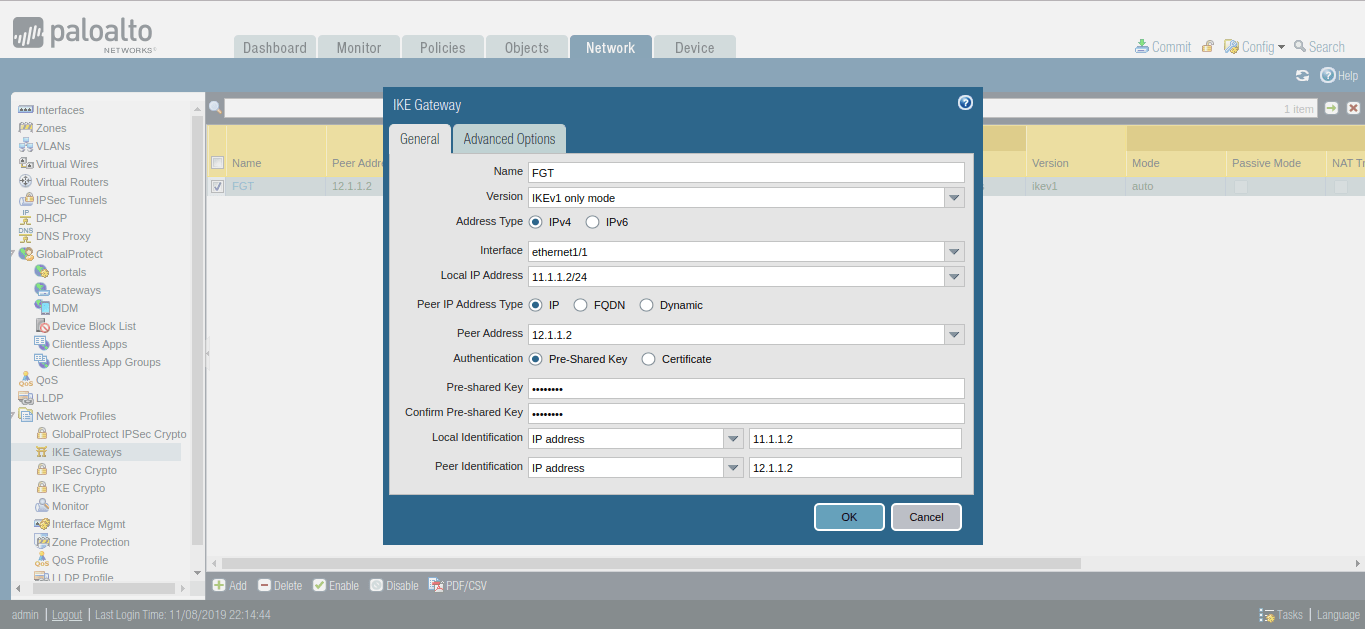
Now, you need to go Network >> Network Profiles >> IKE Gateways >> Add. In General Tab, You need to define the name of the IKE Gateway Profile. In Interface filed, you need to define your Internet-facing Interface, In my case, ethernet 1/1, which has 11.1.1.2 IP Address. Define the Peer IP Address Type IP. Define the peer address, in my case 12.1.1.2. Select the Authentication Method, i.e. Pre Shared Key or Certificate. In this scenario, I’m using the Pre-shared Key. Define the Pre Shared key next and note down the key because you need it to define in FortiGate Firewall. Define the Local and Peer IP address in the Local Identification and Peer Identification field.
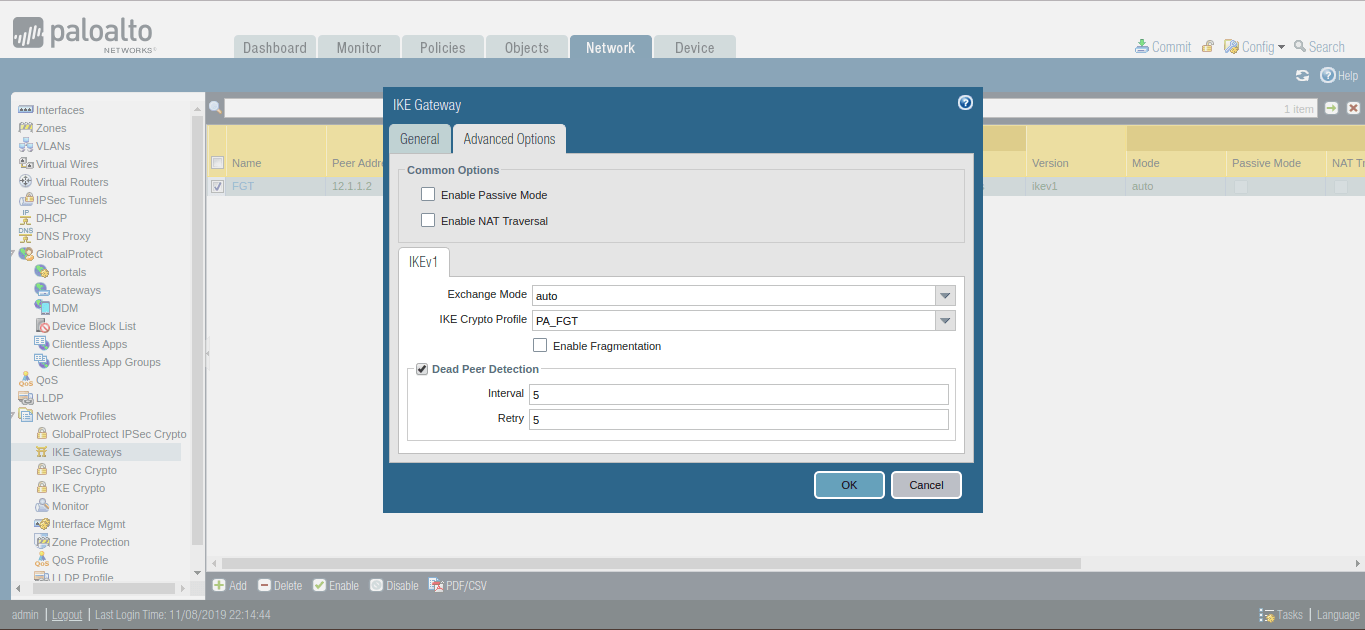
Click on Advanced Option, In IKEv1, select IKE Crypto Profile, which defines in Step 3.
Creating the IPSec Tunnel
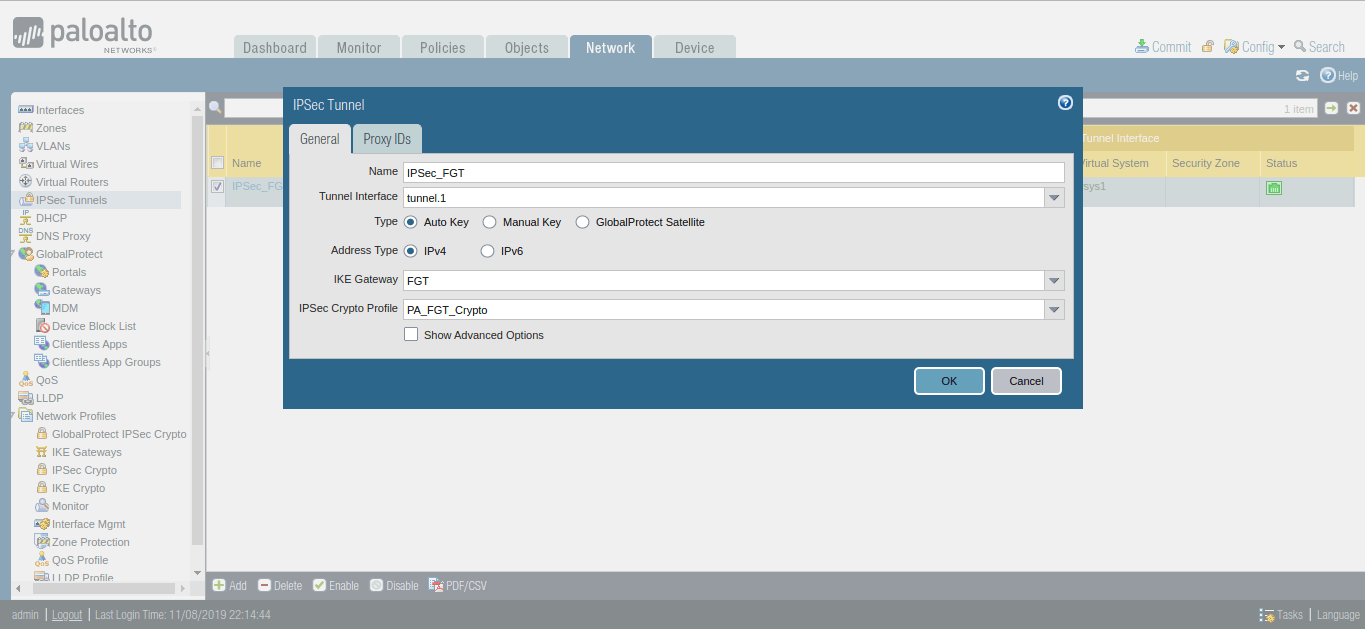
We have defined IKE Gateway and IPSec Crypto profile for our IPSec Tunnel. Now, we have to define the IPSec Tunnel. Go to Network >> IPSec Tunnels >> Add. Define the user-friendly name for IPSec Tunnel. Next, select the tunnel interface, which defined in Step 2. Select the profiles for IKE Gateway and IPSec Crypto Profile, which defined in Step 3 and Step 5 respectively.
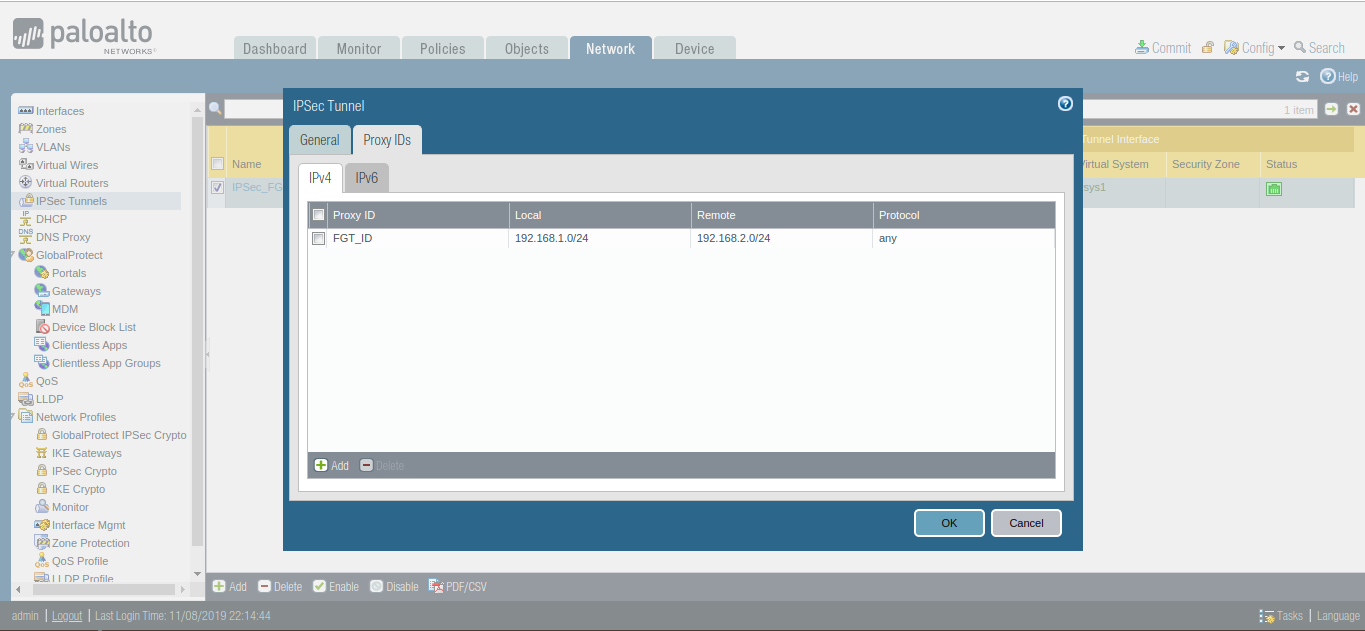
Go to the Proxy IDs Tab, and define Local and Remote Networks. In this scenario, I’m using 192.168.1.0/24 and 192.168.2.0/24 in LAN Networks.
Creating the Security Policy for IPSec Tunnel Traffic
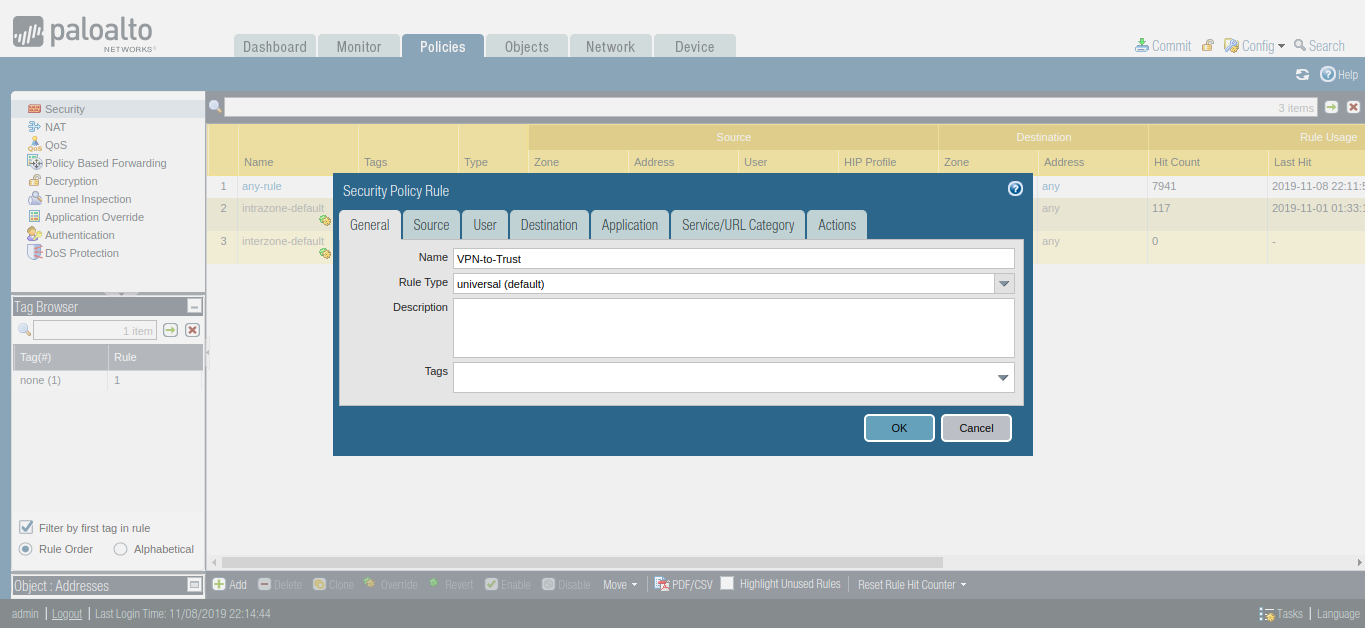
Now, you need to create a security profile that allows the traffic from VPN Zone to Trust Zone. You need to Go Policies >> Security >> Add to define a new Policy.
Configuring Route for Peer end Private Network
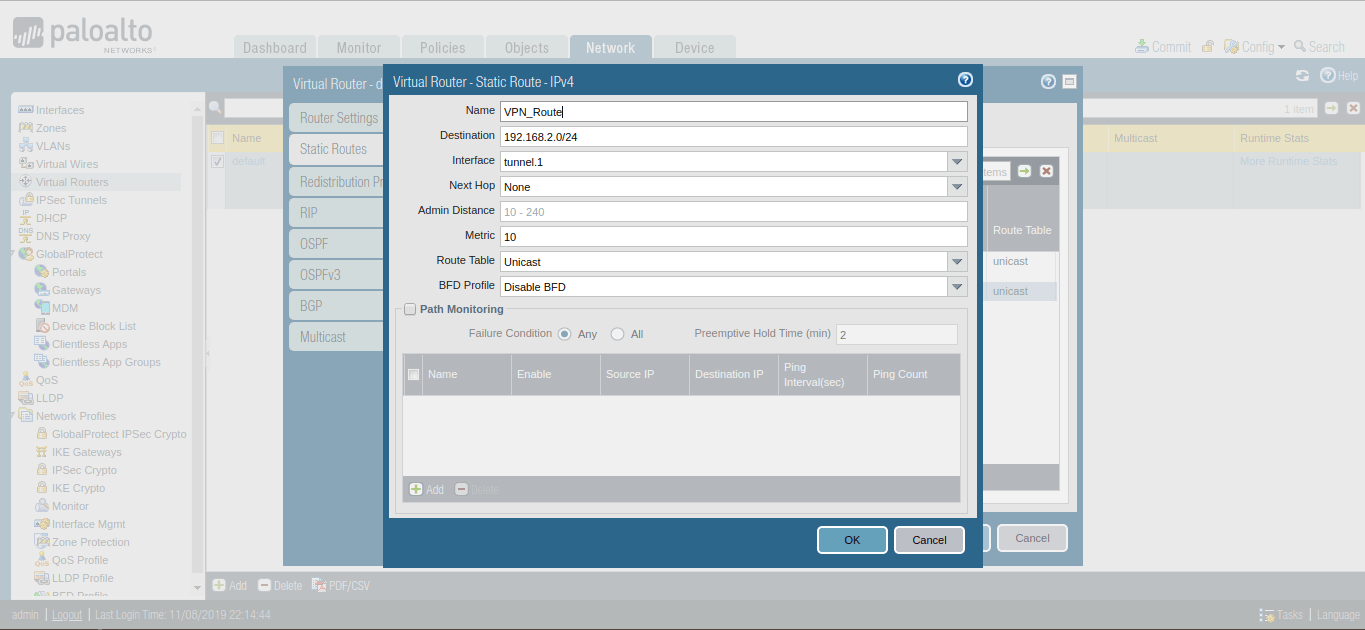
Now, you need to provide a static route for Peer end Private Network. Just go to Network >> Virtual Routers >> Default >> Static Routes >> Add. Select the Name for this Route and define the destination network for this route, i.e. 192.168.2.0/24 in this example. Select the Next Hop to Tunnel Interface which is defined in Step 2.
We finished the configuration of the IPSec tunnel in the Palo Alto firewall. Now, we will configure the IPSec tunnel in FortiGate Firewall.
Steps to configure IPSec Tunnel in FortiGate Firewall
Now, we will configure the IPSec Tunnel in FortiGate Firewall. Here, in this example, I’m using FortiGate Firmware 6.2.0. Although, the configuration of the IPSec tunnel is the same in other versions also. Just login in FortiGate firewall and follow the following steps:
Creating IPSec Tunnel in FortiGate Firewall – VPN Setup
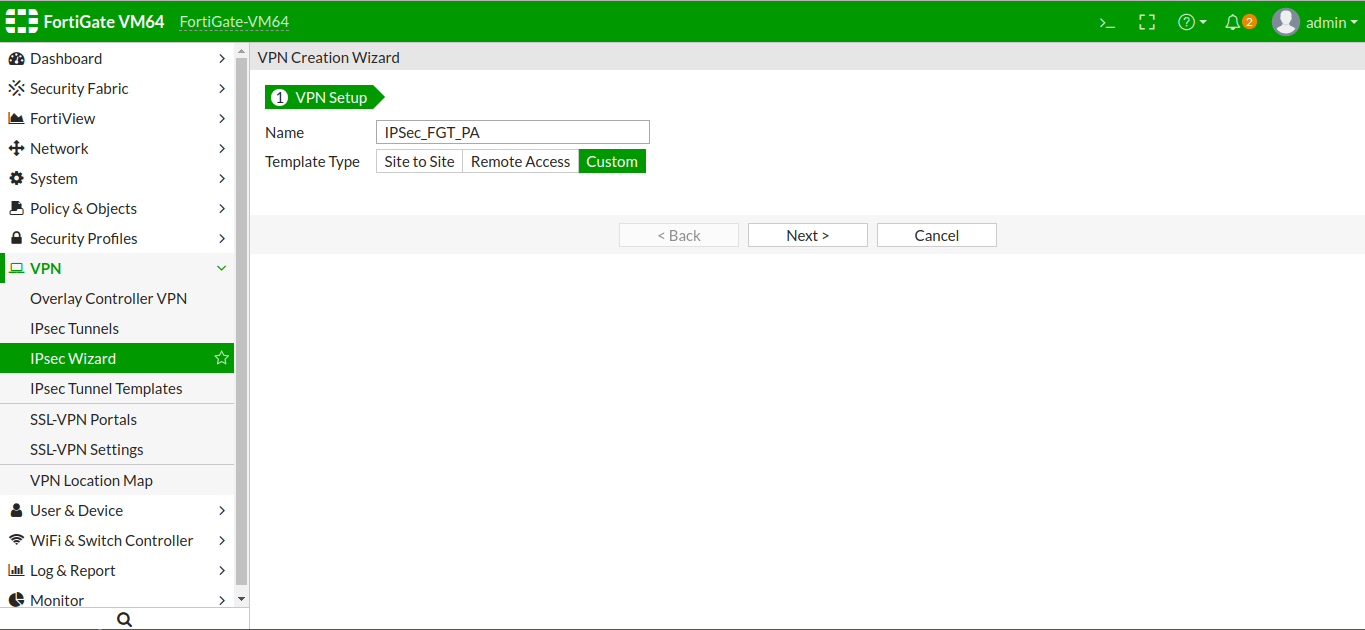
Unlike the Palo Alto Firewall, the FortiGate firewall gives you templates, which help you to create an IPSec tunnel by clicking Next Next, etc. Unfortunately, pre-defined templates are only available for Cisco ASA and FortiGate itself. Therefore, we need to create a custom tunnel. In order to create an IPSec tunnel, just log in to FortiGate Firewall, and locate VPN >> IPSec Tunnels >> Create New. In the VPN Setup tab, you need to provide a user-friendly Name. Now, In Template Type select Custom and click Next.
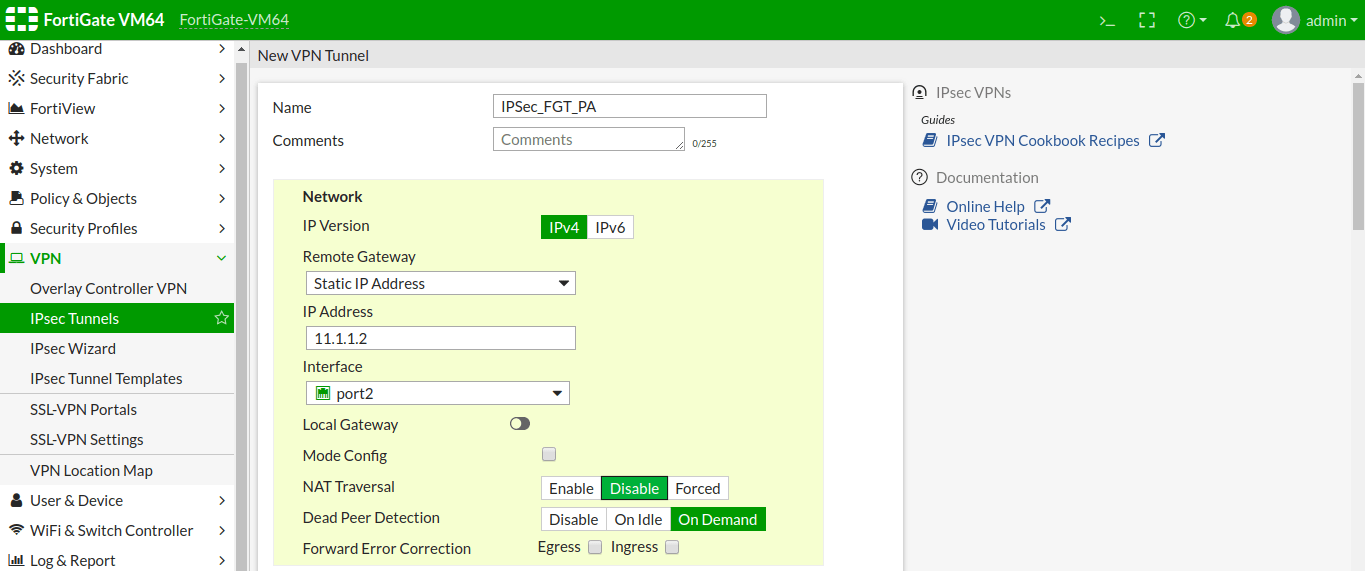
IPSec Tunnel Phase 1 & Phase 2 configuration
Now, we will configure the Gateway settings in the FortiGate firewall. Select, IP Version IPv4/IPv6, In the Remote Gateway select Static IP Address. In the IP Address field, give the remote site Palo Alto Firewall Public IP i.e. 11.1.1.2.
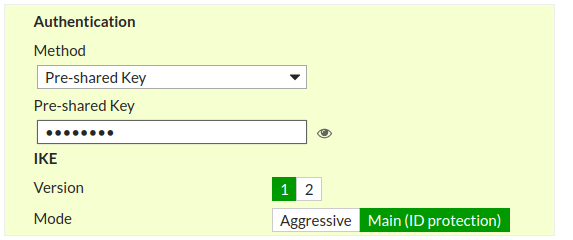
Scroll down the page, and in the Authentication field, select the authentication method Pre-Shared Key and Provide the exact same key here as shown in the below image. Select the IKE version 1 and Mode as Main (ID Protection).
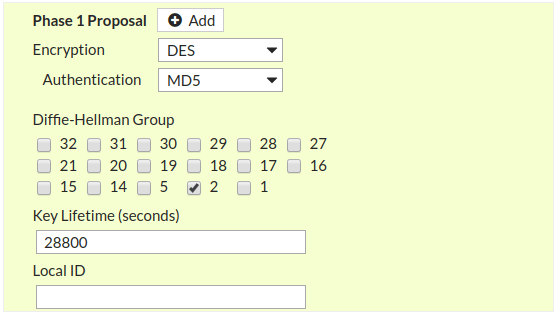
Now, you need to configure the IPSec tunnel Phase 1. As in Palo Alto configuration, we use DES, MD5 and Group 2 for Encryption, Authentication and DH Group field. You need to configure the same parameters here as shown in the screenshot.
Key Lifetime must be same as Palo Alto IPSec tunnel Configuration!
After configuring the Phase 1 of IPSec tunnel, now you need to configure Phase 2 as well. Scroll down the Page and edit Phase 2 Selectors. In Local Address and Remote Address fields, you need to define the subnets/ IP address you want to access from this VPN tunnel. In my scenario, I just want connectivity between both LANs. So, In Local Subnet, my LAN subnet will be 192.168.2.0/24 and in Remote Subnet, my remote subnet will be 192.168.1.0/24.
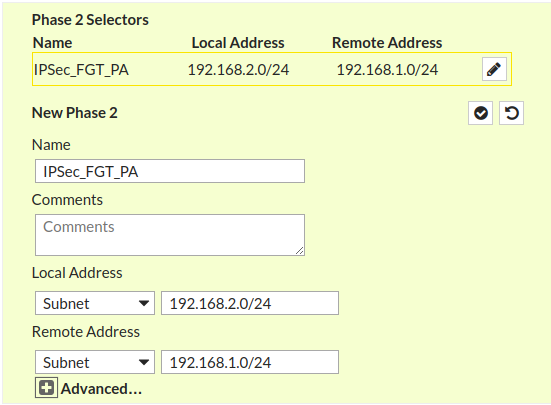
Now, you need to click on (+)Advanced… and configure the Encryption, Authentication, DH Group and Key Lifetime for Phase 2 of IPsec tunnel. These parameters must be the same as Palo Alto firewall Phase 2.
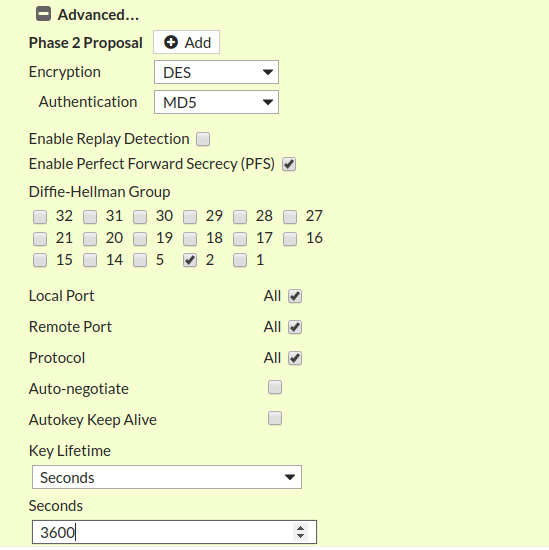
Congratulations! We have successfully configured the IPSec tunnel in the FortiGate firewall. Now, you need to create Security Policy and Route for this VPN tunnel.
Configuring Static Route for IPSec Tunnel
Now, you need to add a static route for the remote subnet in the FortiGate firewall routing table, so that traffic can be sent and receive through this tunnel. Access the Network >> Static Route >> Create New. Just define the remote subnet 192.168.1.0/24 to the destination field and select the Tunnel Interface in Interface filed.
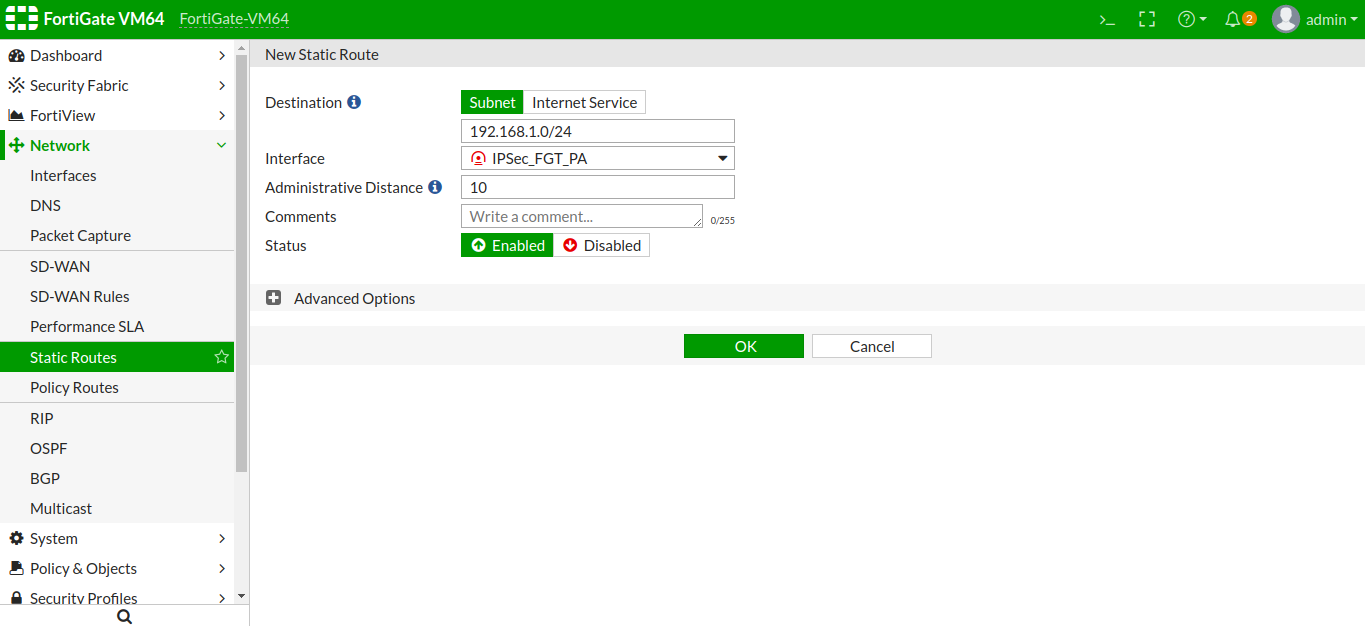
Configuring the Security Policy for IPSec Tunnel
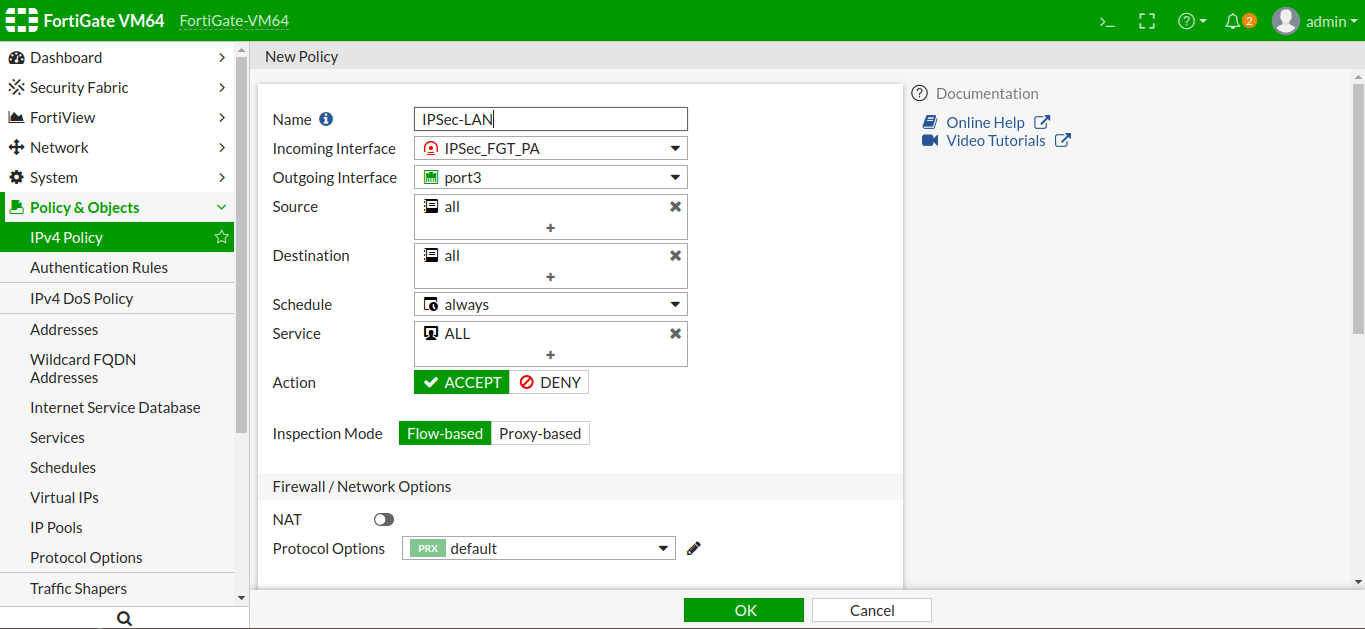
Access the Policy & Objects >> IPv4 Policy >> Create New. Select the Incoming Interface to the tunnel interface and Outgoing Interface to LAN Interface (i.e. Port3 in my case). Allow the traffic you want to allow from this tunnel. In this example, I set Source, Destination, and Service to ALL.
If you need to send and recevie traffic to remote location, you need one more security policy.
Finally Initiating the tunnel and verify the configuration
We have done the configuration of the IPSec tunnel on both the Palo Alto and FortiGate firewalls. Now we need to initiate the tunnel. In order to initiate the tunnel, just access Palo Alto Firewall and run the following commands:
[terminal]test vpn ike-sa gateway FGT[/terminal]
[terminal]test vpn ipsec-sa tunnel IPSec_FGT:FGT_ID[/terminal]
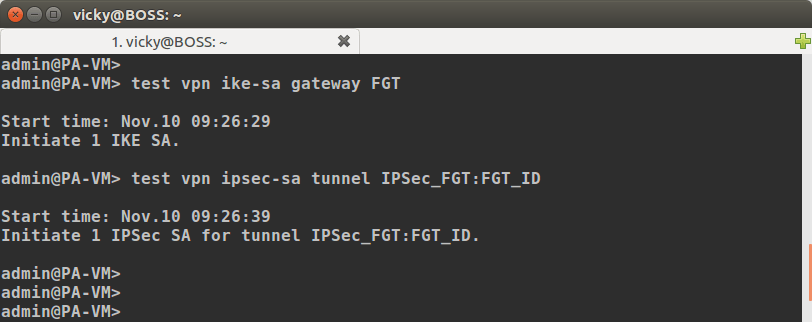
You need to replace FGT and IPSec_FGT:FGT_ID with your IKE Gateway profile and IPSec Tunnel name respectively. Once you run both the commands in Palo Alto CLI, you can check your tunnel will be brought up.
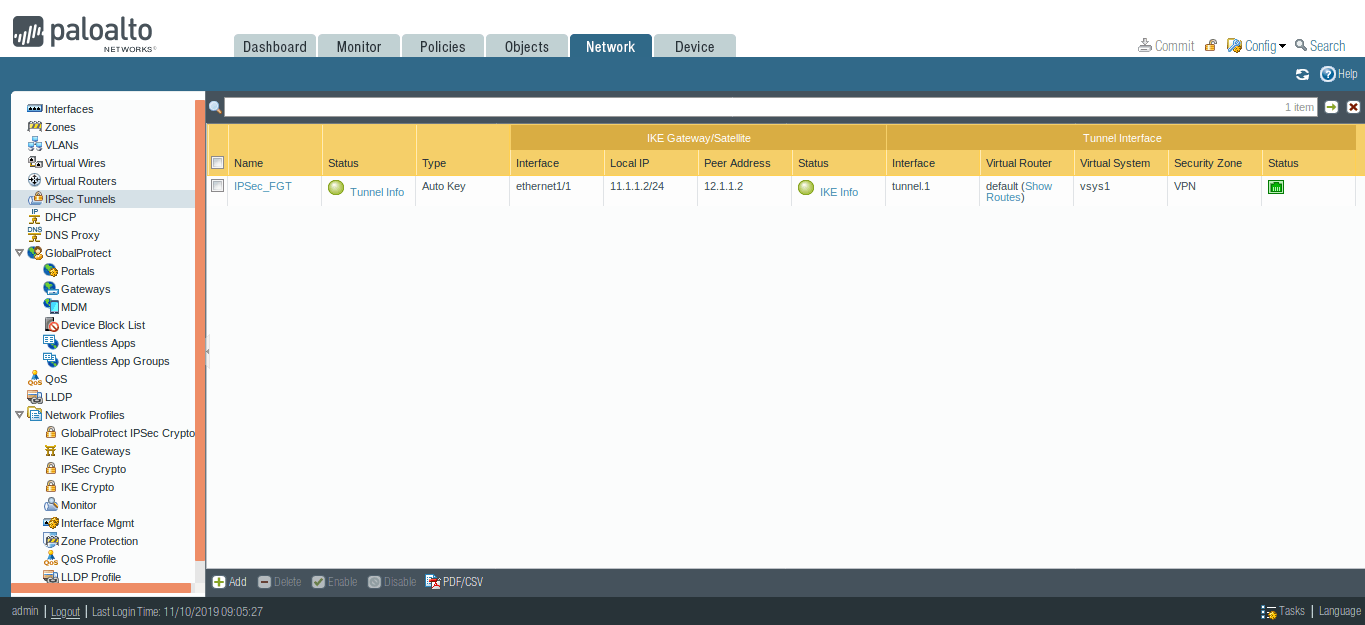
Go to Network >> IPSec Tunnels and check the status of the IPSec Tunnel status on the Palo Alto Firewall.
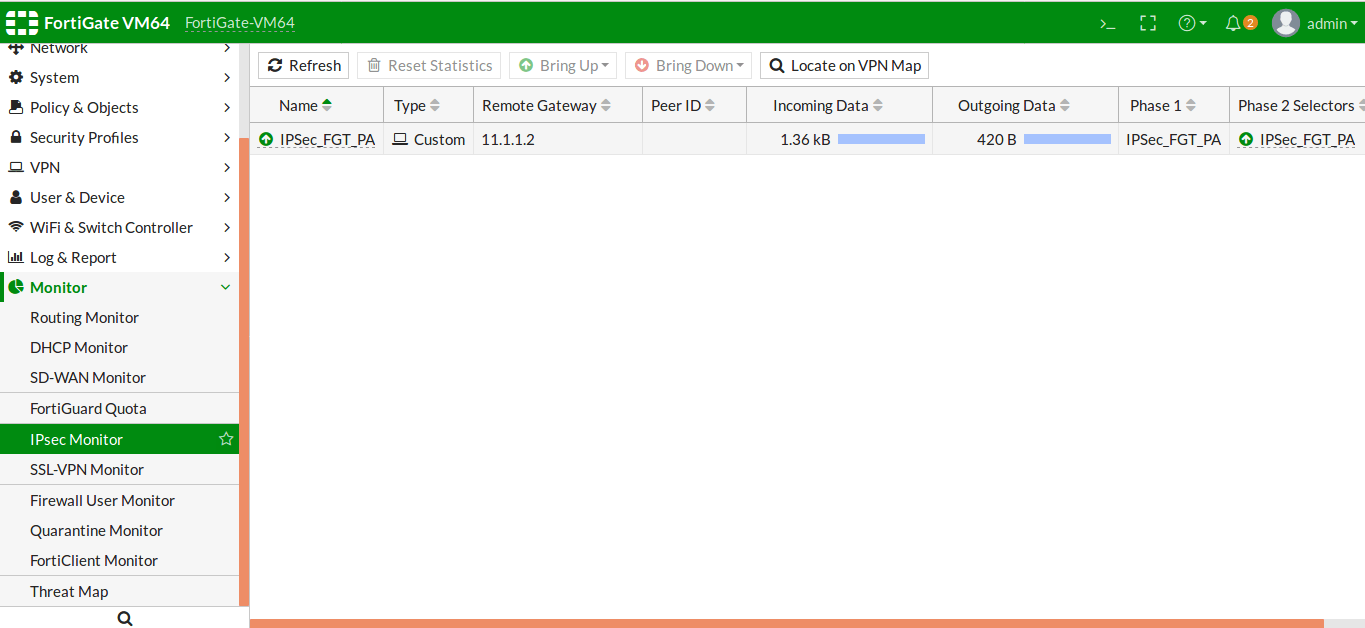
Go to Monitor >> IPSec Monitor and check the tunnel status on FortiGate Firewall.
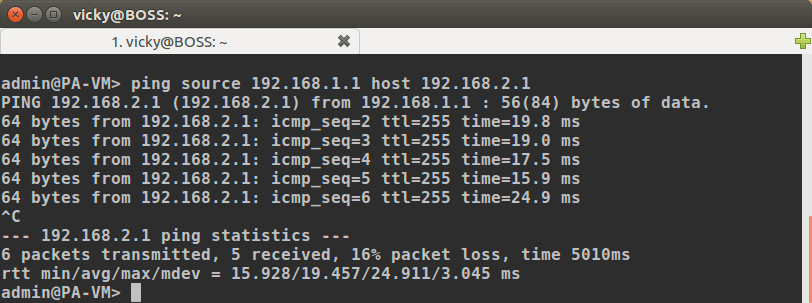
Access the CLI of Palo Alto Firewall and initiate an advanced ping the Remote Network (i.e. FortiGate LAN IP 192.168.2.1) for verification of the IPSec Tunnel.
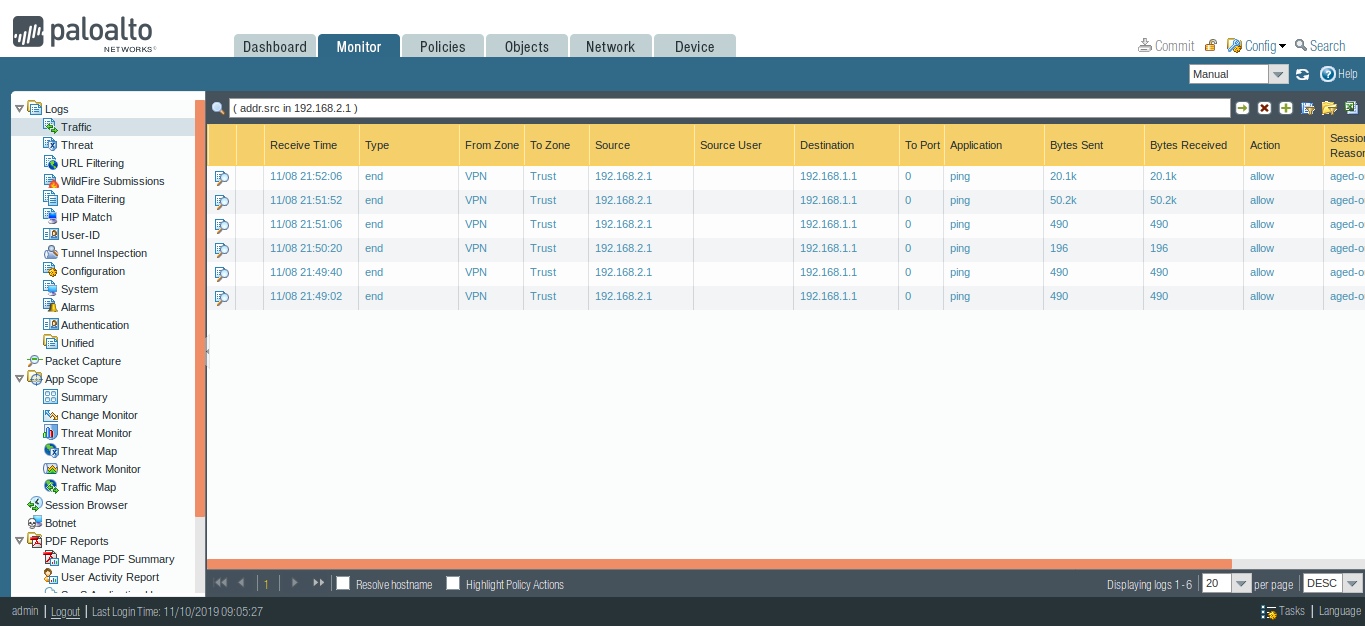
You can also check the logs by accessing Monitor >> Logs >> Traffic.
Related Articles
- How to deploy FortiGate Firewall in VMWare Workstation
- How to Install Palo Alto VM Firewall in VMWare
References
Summary
In this article, we configured the IPSec tunnel between the Palo Alto Firewall and FortiGate Firewall. First, we created an IKE Crypto and IPSec Crypto profile. After, define the IPSec tunnel on Palo Alto Firewall using IKE Crypto and IPSec Crypto profile. Then, we configured the IPSec tunnel on FortiGate Firewall. Although, we need to build a custom template for IPSec tunnel and customize Authentication, Encryption, DH Group and Key Lifetime.
Did you like this article? Please comment in comment box if you need any help!