In this article, we will configure the NetFlow on Palo Alto Next-Generation Firewall. Basically, NetFlow is a network utility, developed by Cisco. NetFlow helps you to get the traffic information that enters and exit to an interface. So, by configuring the NetFlow on the Palo Alto firewall, an administrator comes to know about Source & Destination IP, Source & Destination Port and Services that run on a particular interface. Read More about NetFlow using References given the end of the article. So, let’s start the configuration!
How to configure NetFlow on Palo Alto Firewall
Palo Alto Next-Generation Firewall, allows you to configure the NetFlow on each interface. You need to configure the NetFlow Server Profile First and then you need to apply the NetFlow profile in each interface you want to collect information. After our configuration, we will test the same on the SolarWinds NetFlow application. You can also purchase the tool if you need this for your environment. So, just follow the following steps to configure NetFlow on Palo Alto Next-Generation Firewall.
Step1: Configure the NetFlow Server Profile in Palo Alto Firewall
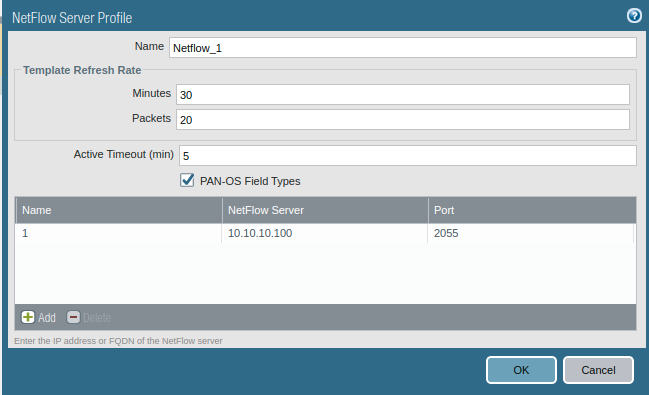
First, we need to configure NetFlow Server Profile on Palo Alto Networks Firewall. Navigate to Device >> Server Profiles >> Netflow and click on Add. You need to provide a name for this server profile. You can also modify the template refresh rate and Active Timeout. In this example, I’ll keep them to default. Now, you need to configure the Netflow Server. You need to provide a Name, IP address & Port of the NetFlow server. The default port of NetFlow is 2055. Once, you configured all of the given details, your configuration window will be looks like the below image.e
Step 2: Configure the NetFlow Server to Interfaces
As we already discussed, we need to configure the same NetFlow profile on Network Interfaces. In this example, I’vee configured two interfaces, i.e. LAN & Internet. So, I’ll put to the same NetFlow profile on both the network interfaces. Navigate to Network >> Interfaces and select the interface on which you want to configure Netflow profile. Now, you just need to select the server profile we created in the previous step.
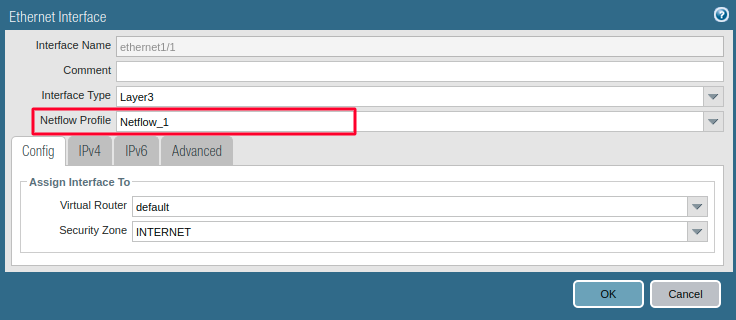
Once, you configured the Netflow on Palo Alto Interfaces, you will notice the Netflow server sign is configured on Network Interface.

Step 3: Configure a service route for NetFlow Traffic
If the firewall is communicating with your Netflow server using the mgmt interface, then you don’t need to configure the service route. But, in case Palo Alto firewall communicating with Netflow server different data plane interfaces, you need to configure the service route. You need to access, Device >> Setup >> Service and click on Service Route Configuration. Now, select the NetFlow and select the right data plane interface. In this example, I am directly accessing the NetFlow server. So, I am not configuring any additional configurations.
Step 4: Monitor the Interface’s traffic on Destination NetFlow Server
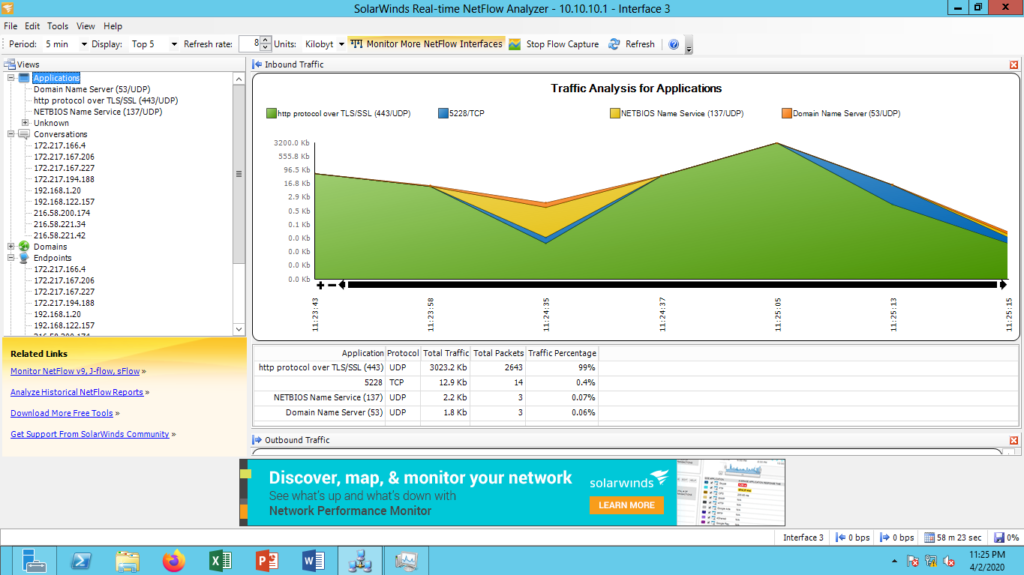
This is the final step of the Netflow configuration on Palo alto firewall. We already set up the NetFlow server. In this example, I am using the SolarWinds Netflow server. You need to flow the basic setup configuration depending on your Netflow server. Once, you correctly setup, everything, you will find the firewall interfaces on your Netflow application as per the given image.
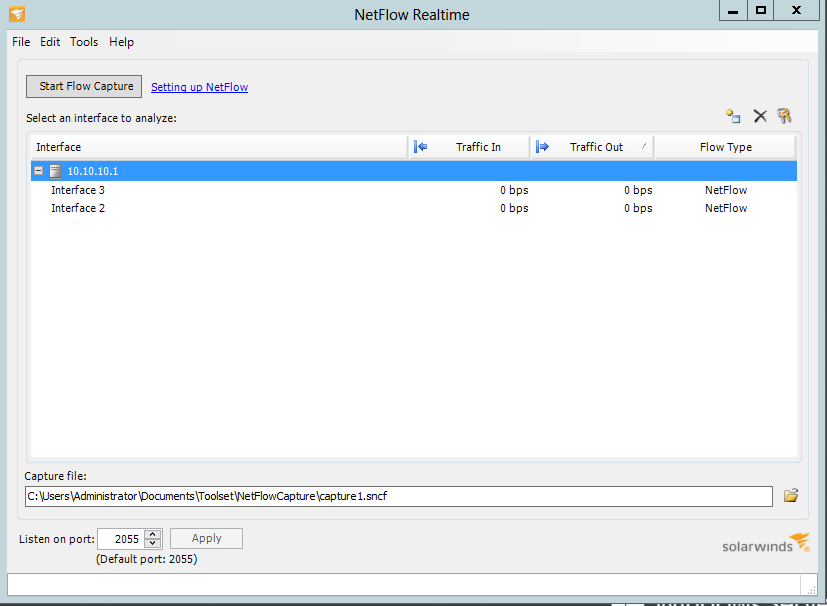 Once, you have done everything, you can check the Application/Services, Source & Destination IP address and many other things on your Netflow application.
References
Related Articles
- How to configure Syslog Server for Logs Forwarding in Palo Alto Firewall
- How to deploy the Palo Alto Firewall directly in GNS3
- IPSec VPN between Palo Alto and FortiGate Firewall
Summary
In this article, we configured the Netflow server on Palo Alto Next-Generation Firewall. We set up the Netflow server profile, and then we set the NetFlow server on network interfaces. You need to set up a service route if your Netflow server is connected through the data plane interfaces. Finally, we tested all of the configurations and we are getting logs on the Netflow server.
Did you like this article? Please comment in the comment box if you need further information!